How to create an Item List for SmartFlow integration from Cornerstone?
Print
Modified on: Wed, 24 Jun, 2020 at 7:08 AM
With SmartFlow-Cornerstone integration, you can synchronize Staff and Inventory from Cornerstone to SmartFlow. To do this, simply follow the steps described in THIS article.
However, you can still create an appropriate Cornerstone Staff List along with the Inventory list and then send it to your SmartFlow consultant for further uploading. Although the first option seems to be preferable, you are free to choose the best option for you.
To create your Cornerstone Inventory List please follow the steps below:
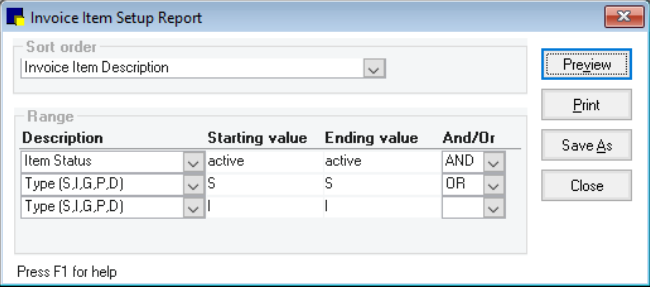
First of all, open the Reports menu and click Invoice Item > Invoice Item Setup Report. Either double-click on the report in the list or click Create Report and the next pop-up appears:
From the Sort order drop-down list, select one of the following options:
• Invoice Item Description - sorts items alphabetically by invoice item name.
• Invoice Item ID - sorts items alphabetically by invoice item ID.
Use the following options from the Description drop-down lists to filter your list:
• Item Status - to include only active items and then enter/select the following:
- Starting value: Active
- Ending value: Active
- And/Or: AND
• Type - to include your service type items after what you can enter/select the following:
- Starting value: S
- Ending value: S
- And/Or: OR
• Type - to also include your inventory type items and then enter the following:
- Starting value: I
- Ending value: I
To check and confirm the information in the report looks correct click Preview, and then, if everything is fine, Save:

Right after that, you will need to:
1. Choose the location to save the report.
2. Name the file using the following convention (to best assist your SmartFlow consultant): CLINIC ID-CLINIC INITIALS-itemlist (for example, 123456-APVH-itemlist).
3. Select Excel as the file type and finally click Save.
NOTE: Sometimes it could be necessary to adjust the Excel file by removing any items not necessary for integration. To do this, apply column filters and sort by the classification column. After that, select and delete item rows that you do not want to export into Smart Flow and save the file with your changes.
The last thing to do is to send the file to your SmartFlow consultant.
We hope you found this information useful!
Did you find it helpful?
Yes
No
Send feedback Sorry we couldn't be helpful. Help us improve this article with your feedback.


